Transform your cramped laundry space into an organized, efficient powerhouse with these space-maximizing strategies that professional organizers swear by.�
When I first moved into my 900-square-foot apartment, the “laundry room” was nothing more than a narrow closet with a stacked washer-dryer combo and barely enough space to turn around.
Sound familiar? After years of wrestling with overflowing hampers and detergent bottles tumbling off precarious shelves, I discovered that even the tiniest laundry spaces can become models of efficiency—you just need to think vertically, strategically, and sometimes a little unconventionally.
Whether you’re dealing with a basement corner, a hallway closet, or a multipurpose mudroom, these ten proven strategies will help you squeeze maximum functionality from every precious square inch.
From ingenious storage hacks that professional organizers use in million-dollar homes to budget-friendly DIY solutions that cost less than $50, you’ll discover how to transform laundry day from a frustrating chore into a streamlined process.
The secret isn’t just about adding more storage—it’s about creating zones, maximizing vertical real estate, and choosing solutions that work double duty. By the time you finish implementing these ideas, you’ll wonder how you ever managed without them.
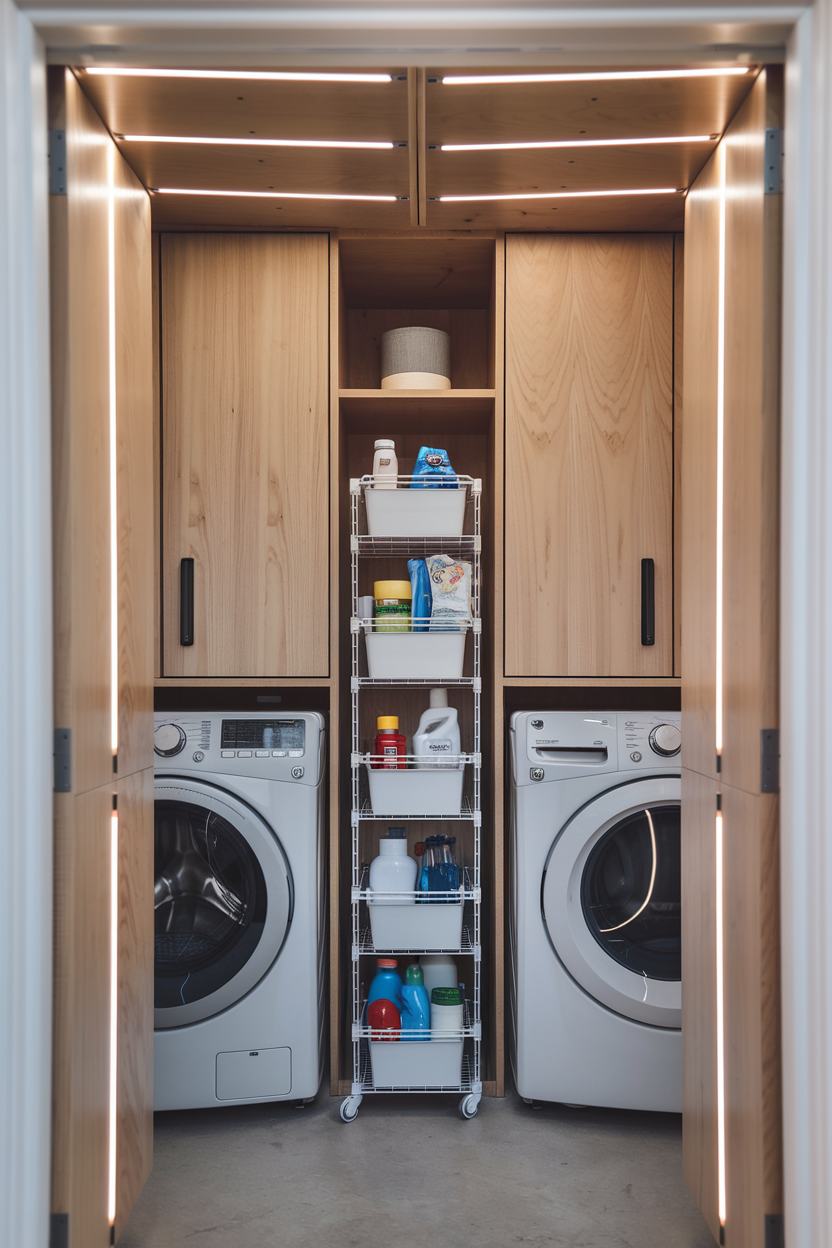
1. Install a Full-Height Storage Tower Between Machines
Why This Strategy Works Like Magic
The narrow gap between your washer and dryer—typically 6 to 12 inches wide—represents prime real estate that most people completely ignore.
This dead space can accommodate a custom-built or store-bought rolling storage tower that holds detergent, fabric softener, stain removers, and cleaning supplies at the perfect height for easy access.
Best Implementation Approach
Measure your exact gap width and the height from floor to any overhead cabinets or shelving. Look for slim rolling carts with multiple tiers, or build a custom unit using wire shelving and casters. The key is choosing a tower that’s 1–2 inches narrower than your gap to ensure smooth rolling action when you need to access the back of your machines for maintenance.
Professional Organizer’s Secret
Add a magnetic strip to one side of your tower to hold small metal items like safety pins, buttons, or measuring spoons for homemade detergent. This tiny detail prevents these essentials from migrating throughout your home and creates a dedicated spot for laundry-specific tools.
Potential Drawback to Consider
Rolling towers can sometimes shift during wash cycles if your machines vibrate significantly. Combat this by adding rubber feet to the bottom or positioning the tower so it’s partially secured by the machines on both sides.
2. Transform Your Laundry Room Door Into a Storage Powerhouse
The Overlooked Vertical Surface Revolution
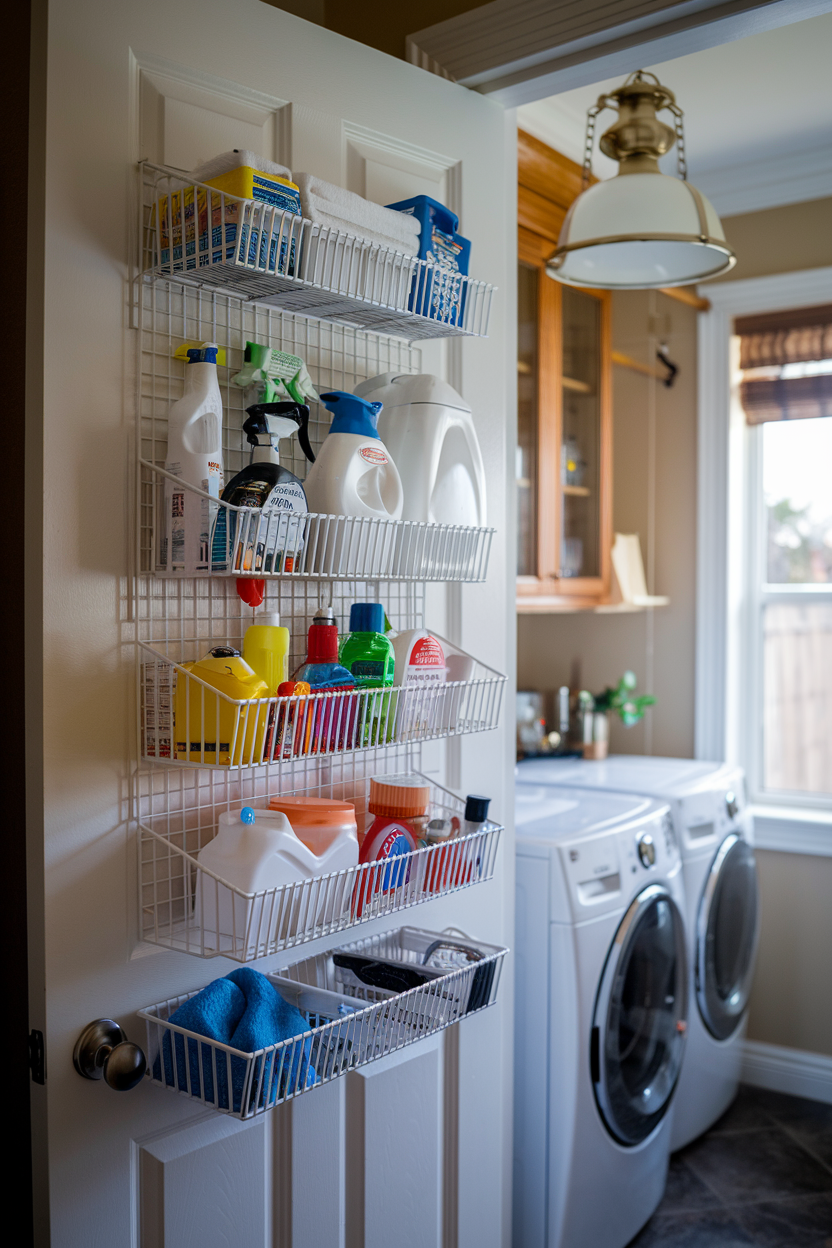
Your laundry room door offers up to 12 square feet of unused storage potential that’s literally staring you in the face every time you do laundry. The back of the door can accommodate everything from cleaning supply organizers to ironing boards, depending on your specific needs and door swing direction.
Strategic Installation Methods
Over-the-door organizers work well for renters, but for permanent solutions, consider mounting a pegboard system or installing narrow shelves directly onto the door. For bi-fold closet doors, focus on the larger panel and ensure your storage solutions don’t interfere with the folding mechanism.
Space-Maximizing Configuration
Create zones on your door: upper section for light items like dryer sheets and stain-removal pens, middle section for everyday supplies like detergent pods, and lower section for heavier items like spray bottles. This weight distribution prevents the door from sagging over time.
Insider Tip for Maximum Efficiency
Install a slim ironing board holder on the upper portion of the door, paired with a small basket below for the iron and accessories. This combination eliminates the need for a separate ironing closet and keeps everything contained in your laundry zone.
Watch Out for This Common Mistake
Many people overload door storage, causing hinges to loosen and doors to stick. Limit total weight to 15–20 pounds and ensure items don’t extend beyond the door frame when closed.
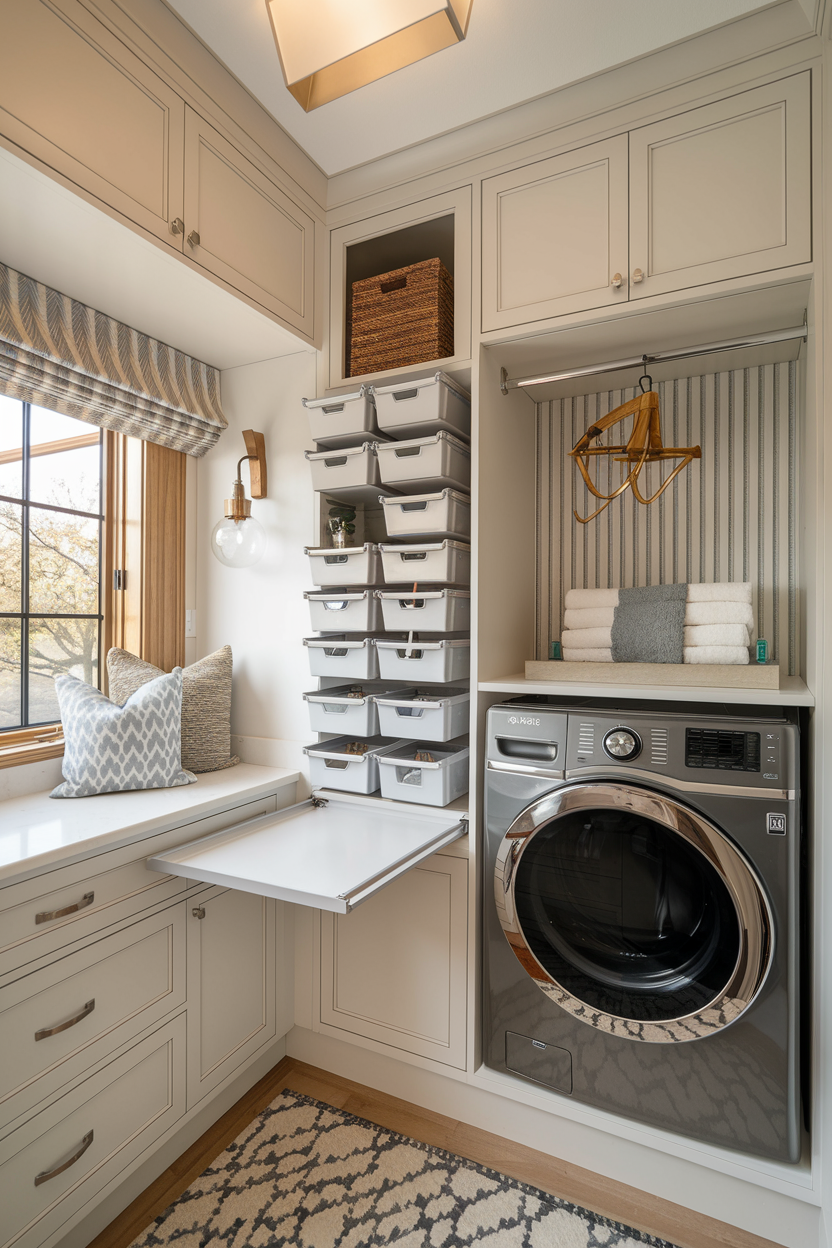
3. Create a Fold-Down Countertop That Disappears When Not Needed
The Ultimate Space-Saving Work Surface
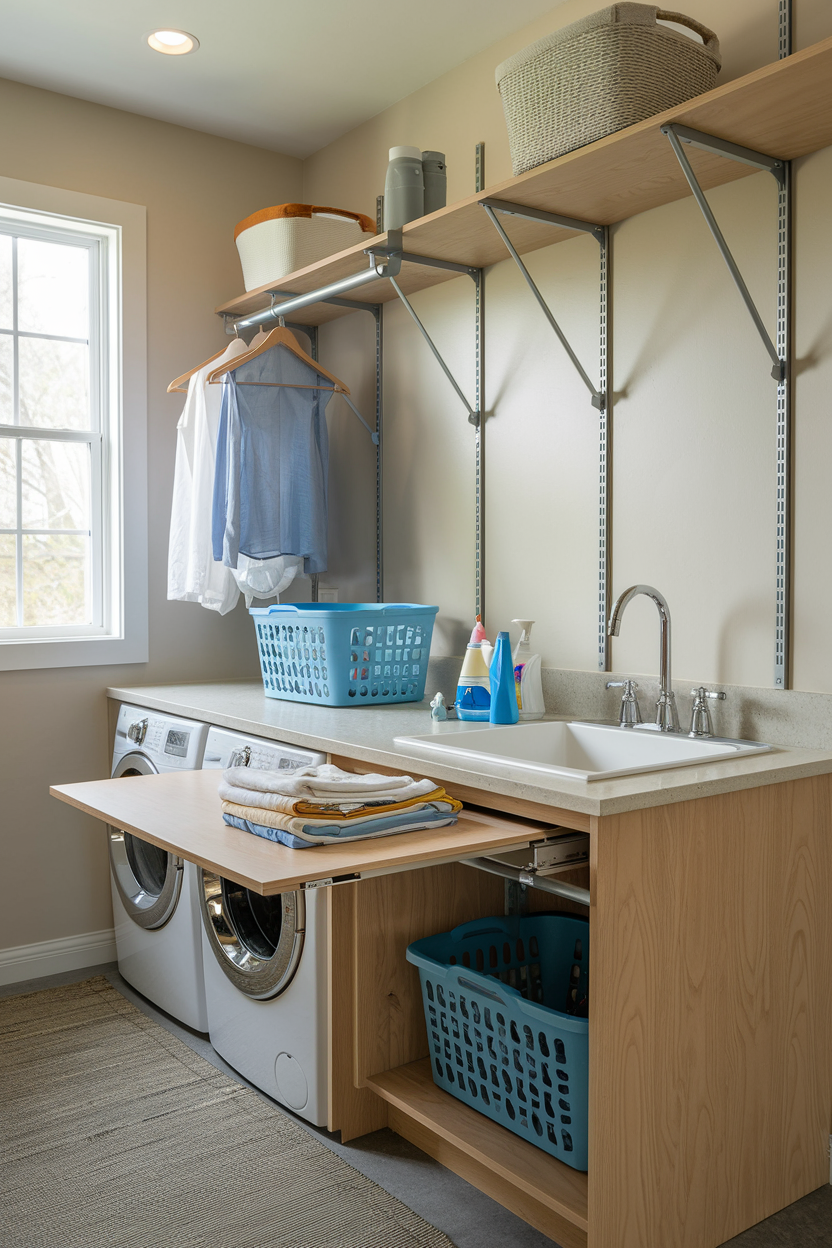
A fold-down countertop gives you precious workspace for folding clothes, treating stains, or sorting laundry without permanently sacrificing floor space. When not in use, it folds flat against the wall like a piece of artwork, making your small laundry area feel significantly less cramped.
Construction and Installation Essentials
Mount a sturdy wall-mounted bracket system that can support at least 50 pounds when extended. Choose a surface material that’s easy to clean—laminate, butcher block, or even a large cutting board work beautifully. The ideal height is 36 inches from the floor, matching standard counter height for comfortable use.
Maximizing Functionality Beyond Folding
Add a power strip underneath your fold-down counter to create a charging station for devices while you work. Consider installing a small task light above the area to improve visibility for detailed tasks like mending or stain treatment.
Professional Designer’s Approach
Paint or laminate your fold-down surface to match your existing décor. When folded up, it should blend seamlessly with your wall color or serve as an intentional design element rather than looking like an afterthought.
Installation Reality Check
This solution requires solid wall studs for safe mounting. If your laundry area has drywall without adequate backing, you’ll need to install blocking or choose a different strategy to avoid dangerous failures.
4. Maximize Every Inch Above Your Machines With Tiered Shelving
The Vertical Storage Gold Mine
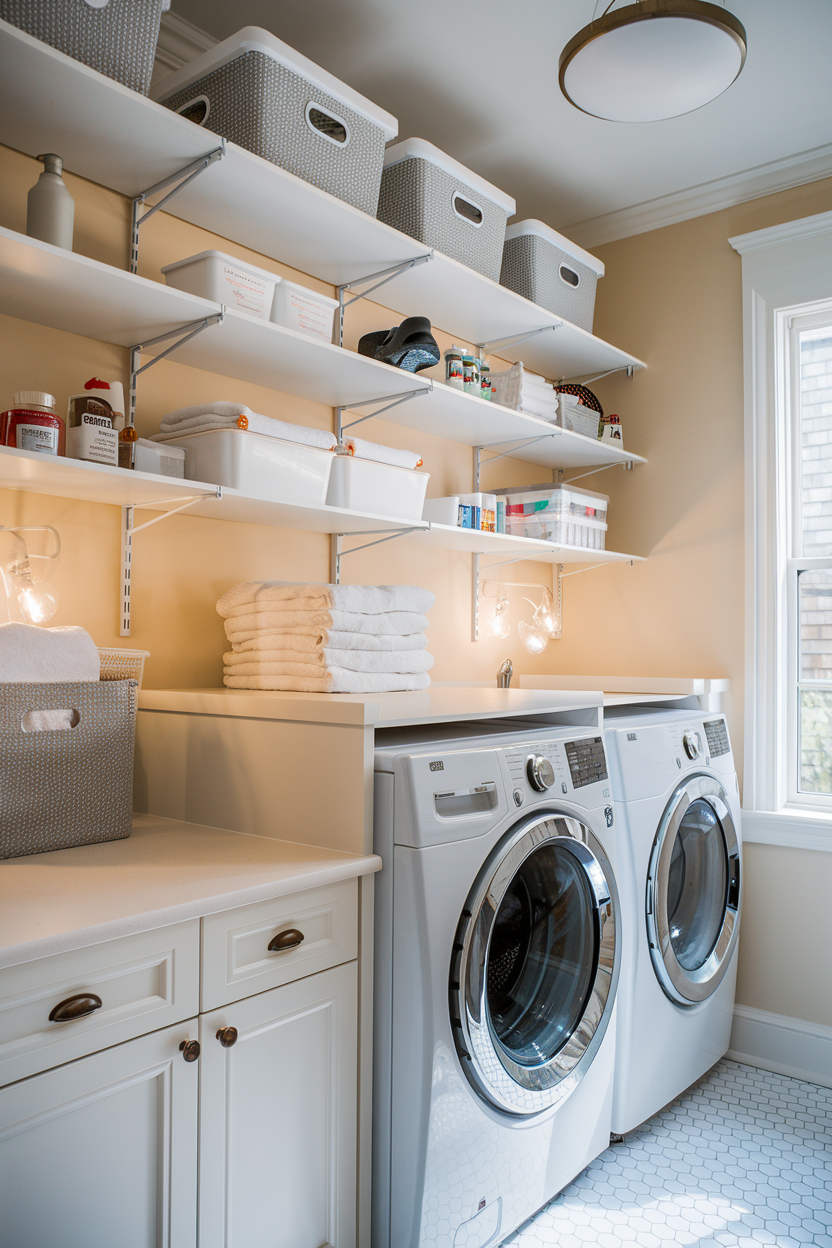
The space above your washer and dryer often extends 3–4 feet to the ceiling—enough room for multiple levels of storage that can hold months’ worth of supplies. Instead of a single shelf that becomes a dumping ground, install a tiered system that creates designated spots for different categories of items.
Strategic Shelf Spacing and Planning
Install the first shelf 18–20 inches above your machines to allow clearance for loading and unloading. Space subsequent shelves 12–15 inches apart to accommodate various container heights. Use the highest shelves for items you access infrequently, like seasonal bedding or backup supplies.
Organization System That Actually Works
Implement a front-to-back system: frequently used items like detergent and fabric softener go in front, while backup supplies and seasonal items stay in the back. Use clear, stackable containers to maximize vertical space within each shelf level.
Safety and Accessibility Considerations
Install a small step stool that slides underneath your machines or hangs on a wall hook. Never store heavy items above shoulder height, and ensure nothing can fall onto your machines during operation.
Common Planning Mistake
Many people install shelves too close to their machines, making it difficult to reach items or clean the area. Leave at least 4–6 inches between the back wall and your shelf fronts to accommodate reaching and cleaning.
5. Install Pull-Out Drawers Underneath Your Washer and Dryer
Hidden Storage That Moves With You
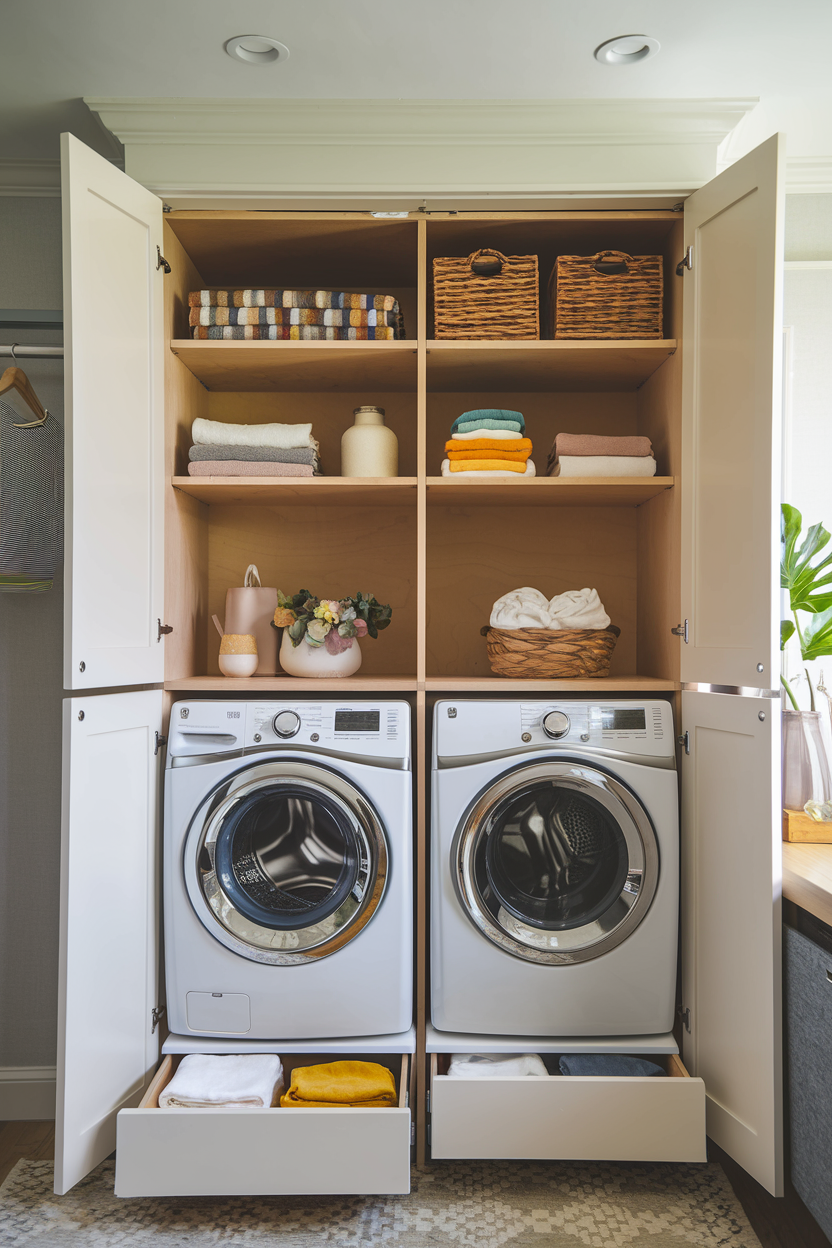
The space beneath front-loading machines represents a significant storage opportunity that most people never consider. Custom pull-out drawers or rolling bins can slide underneath your appliances, providing easy access to bulky items like comforters, beach towels, or seasonal clothing that needs washing.
Measuring and Sizing for Success
Measure the height clearance under your machines (typically 4–8 inches for front-loaders) and the depth from the front edge to any wall obstruction. Account for door swing clearance and ensure your drawers can extend fully without hitting walls or cabinets.
Ideal Items for Under-Machine Storage
This space works perfectly for flat items like table linens, guest bedding, or out-of-season clothes waiting to be laundered. Avoid storing detergents or liquids here, as potential leaks could damage your belongings and create cleaning challenges.
DIY vs. Custom Solutions
Rolling storage bins from home improvement stores often work well for this application and cost significantly less than custom drawers. Look for units with smooth-rolling wheels and low profiles that maximize your available height.
Maintenance Accessibility Warning
Remember that appliance repair technicians need access underneath machines for maintenance. Choose storage solutions that can be quickly and easily removed when service is needed.
6. Create a Hanging Station for Air-Dry Items
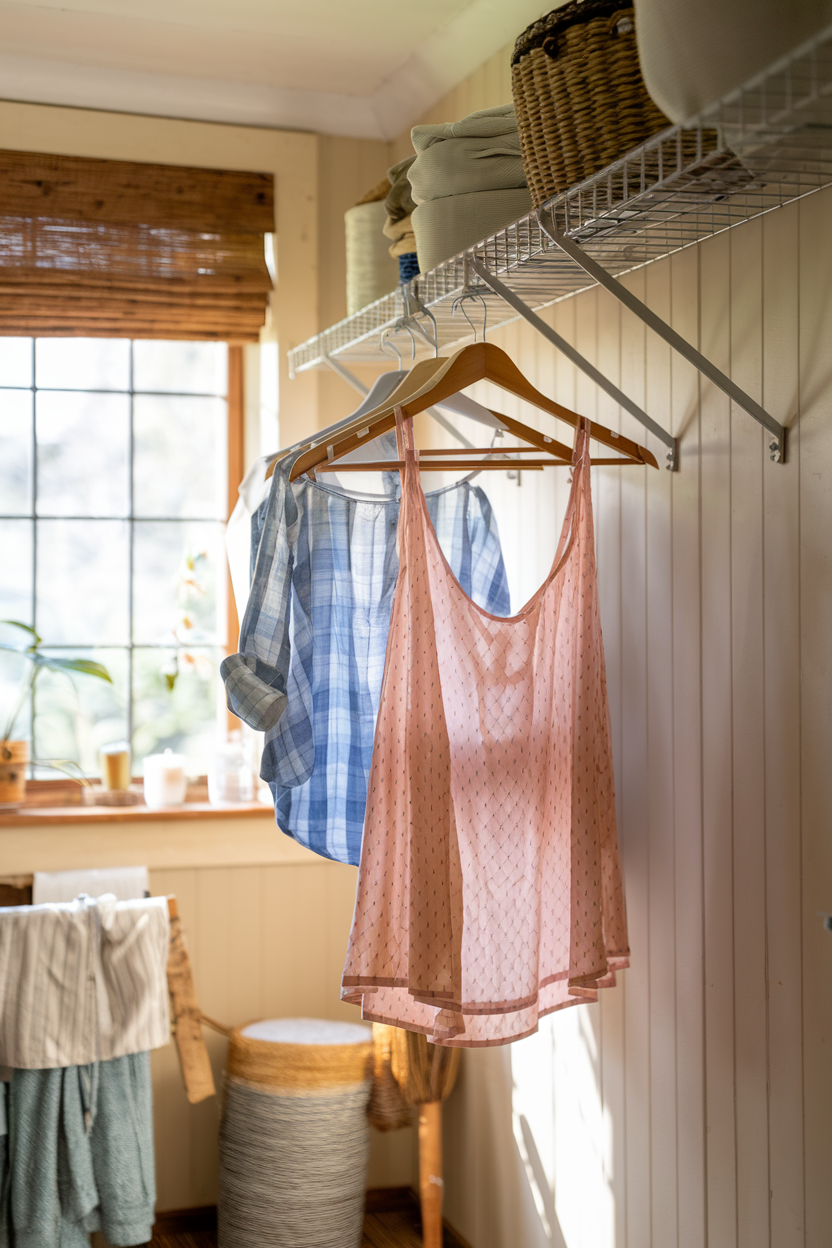
Vertical Drying That Saves Floor Space
Air-drying delicate items doesn’t have to monopolize your laundry room floor. A well-designed hanging system uses vertical space efficiently while keeping clothes properly separated for optimal drying. This approach is particularly crucial in small spaces where a traditional drying rack would block pathways.
Multi-Level Hanging Solutions
Install a ceiling-mounted drying rack that can be raised and lowered with a pulley system, or mount retractable clotheslines at different heights along your walls. The key is creating multiple drying levels without interfering with your workspace or machine access.
Smart Positioning Strategy
Position your hanging station where natural airflow occurs—typically near any ventilation or in the path of air circulation from your dryer vent. This strategic placement reduces drying time and prevents musty odors that can develop in stagnant air.
Seasonal Adaptability
Choose systems that can be completely retracted or removed when not needed. This flexibility allows your laundry room to serve double duty for other purposes during seasons when you’re not air-drying as frequently.
Ventilation Necessity
Ensure adequate ventilation when air-drying indoors to prevent humidity buildup that can lead to mold or mildew issues. A small exhaust fan or dehumidifier may be necessary in particularly tight spaces.
7. Utilize Every Cabinet Door Interior for Maximum Storage

The Hidden Storage Opportunity
If your laundry room includes any cabinets, the inside surfaces of those doors represent valuable real estate for storing lightweight, frequently used items. This strategy works particularly well for small bottles, tubes, and tools that tend to get lost in deeper cabinet spaces.
Strategic Organization by Weight and Frequency
Mount lightweight organizers for items you grab regularly—stain removers, dryer sheets, lint brushes, and measuring cups for homemade detergents. Reserve cabinet interiors for heavier items and use door storage for quick-access essentials.
Custom vs. Off-the-Shelf Solutions
While over-the-cabinet-door organizers offer convenience, custom-mounted solutions often provide better weight capacity and more tailored storage options. Consider your rental situation and long-term plans when choosing between temporary and permanent installations.
Weight Distribution Wisdom
Cabinet doors aren’t designed to support significant additional weight. Limit door storage to items totaling less than 10 pounds to prevent hinge damage and ensure smooth operation over time.
Interference Prevention
Before installing door storage, check that items won’t interfere with shelves inside the cabinet or prevent the door from closing completely. Test with mock-ups before making permanent installations.
8. Build Zones With Stackable Storage Systems
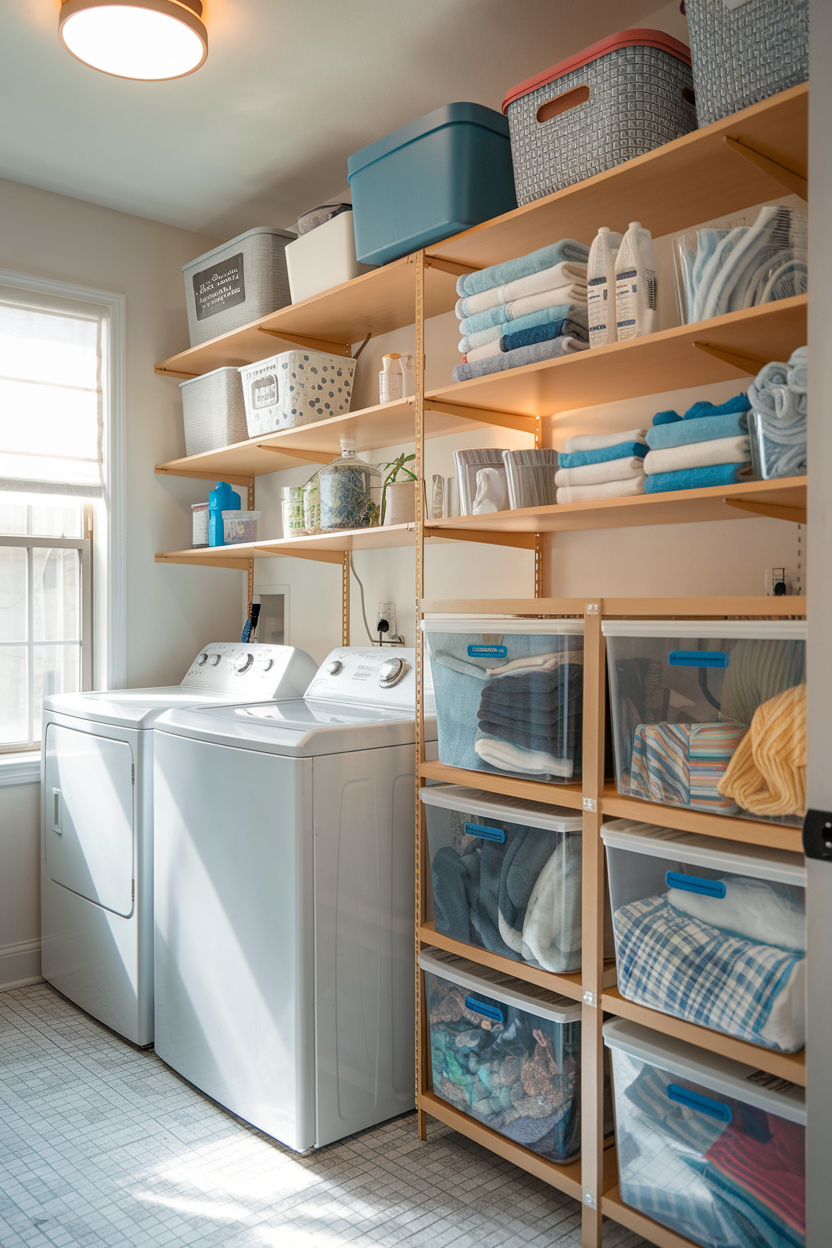
The Psychology of Organized Efficiency
Creating distinct zones for different laundry tasks—washing, drying, folding, and storage—makes your small space feel larger and more organized. Stackable storage systems allow you to build vertical zones that keep related items together while maximizing your limited footprint.
Zone Planning Strategy
Establish a washing zone near your machines with detergents and pretreatment supplies, a folding zone with hangers and fabric fresheners, and a storage zone for clean linens and finished items. Keep each zone’s supplies contained within easy reach of where you’ll use them.
Stackable Container Selection
Choose containers that nest together when empty and stack securely when full. Clear containers allow you to see contents at a glance, while modular systems can be reconfigured as your needs change. Ensure all containers are the same brand and line for consistent stacking.
Labeling for Long-Term Success
Label both the front and top of stackable containers, as you’ll view them from different angles depending on their position in your system. Use water-resistant labels that won’t peel or fade in the humid laundry environment.
Accessibility Considerations
Place frequently used items in the middle levels of your stack—not so low you have to bend, not so high you need a step stool. Reserve top and bottom positions for items you access weekly or less frequently.
9. Install a Retractable Clothesline System
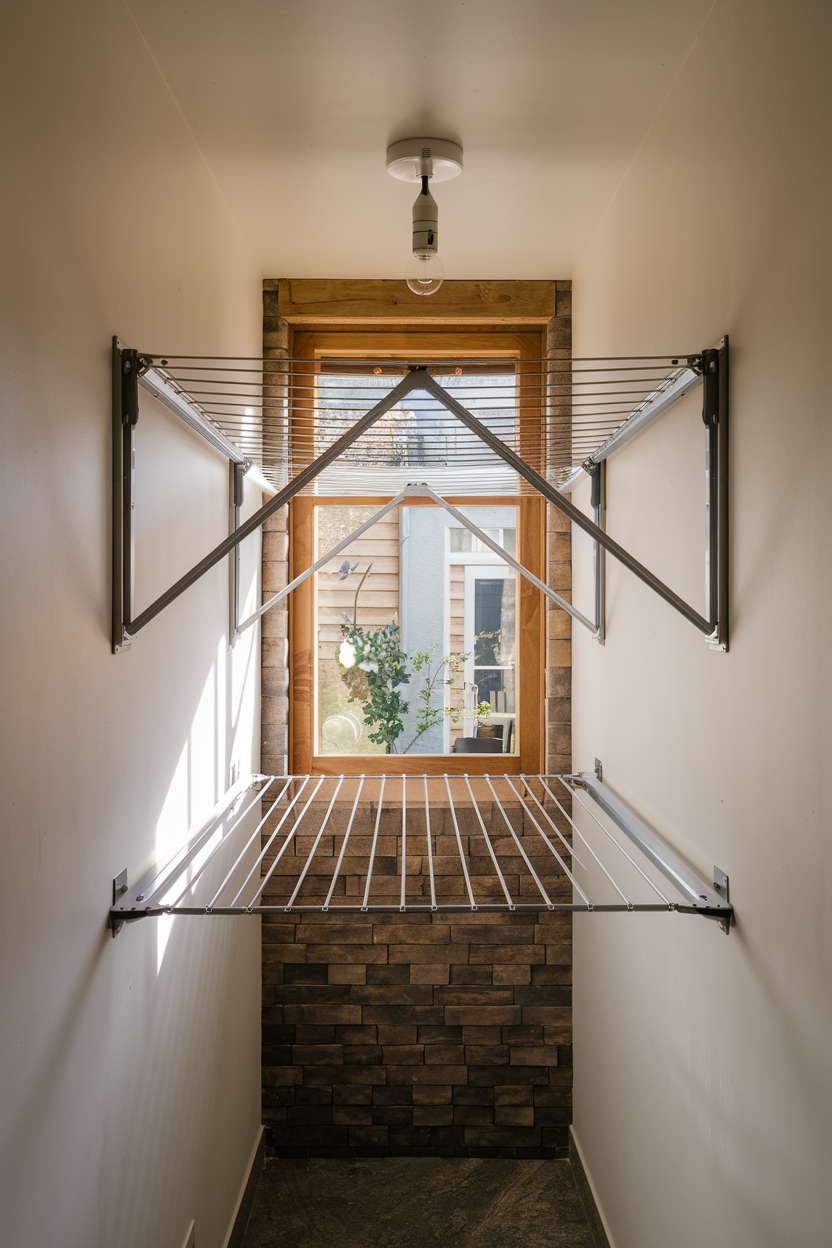
Flexible Drying That Adapts to Your Needs
A retractable clothesline system provides generous drying space when needed while completely disappearing when you don’t need it. This solution is particularly valuable in multipurpose laundry areas where the space serves other functions throughout the week.
Installation Positioning for Maximum Effectiveness
Mount the retractable mechanism on the wall opposite your folding area, allowing the line to extend across your workspace when clothes are drying. This positioning keeps wet items away from electrical appliances while maintaining access to all areas of your laundry room.
Load Capacity and Line Selection
Choose a system rated for at least 20–30 pounds of wet laundry weight. Stainless steel lines resist stretching and won’t leave marks on clothes, while coated lines provide better grip for lightweight items that might slip.
Multi-Line Efficiency
Install two or three retractable lines at different heights to maximize your drying capacity. Stagger the mounting points so lines don’t interfere with each other when extended, and ensure the lowest line is high enough to walk under comfortably.
Weather-Resistant Requirements
Even indoor installations should use weather-resistant hardware to withstand the humidity and temperature fluctuations common in laundry areas. Stainless steel or powder-coated fixtures will maintain their appearance and functionality longer.
10. Create a Command Center on Your Wall
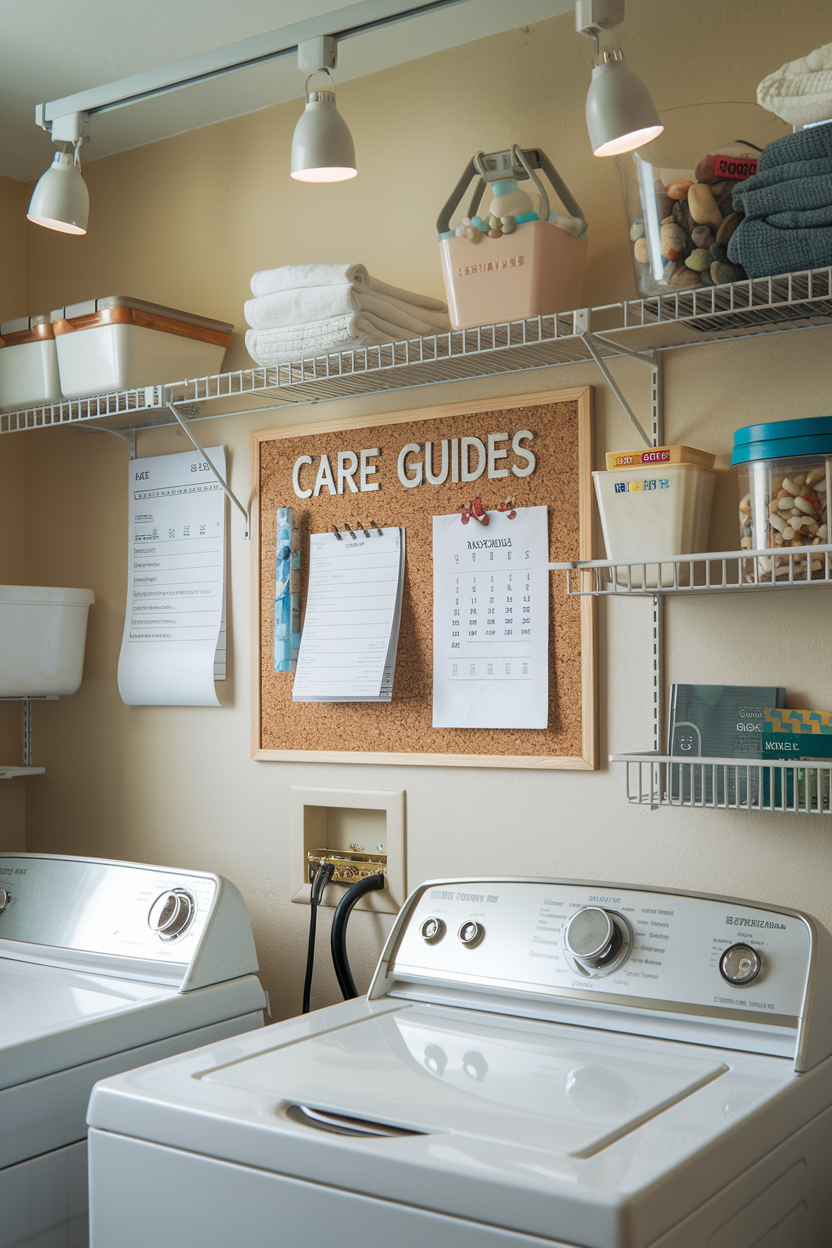
The Central Nervous System of Laundry Efficiency
A well-designed laundry command center consolidates all your care instructions, scheduling tools, and quick-reference guides in one easily visible location. This system eliminates the guesswork from laundry day and helps other family members maintain your organizational standards.
Essential Command Center Components
Include a magnetic board for care labels removed from new clothes, a dry-erase board for tracking loads or stain treatment timing, and small containers for lost buttons or safety pins found in pockets. Add hooks for measuring tools and a small notepad for jotting down fabric care discoveries.
Information Organization Strategy
Create sections for different types of information: permanent reference materials like stain removal guides, temporary notes about current loads or special care items, and family communication about clothing needs or laundry schedules.
Digital Integration Options
Consider including a small tablet holder for accessing digital care guides or laundry apps, or install a charging station for devices you use while doing laundry. This integration helps bridge traditional organizational methods with modern convenience.
Maintenance and Updates
Design your command center for easy updates and modifications. Use removable elements that can be cleaned or replaced, and avoid permanent fixtures that would be difficult to change as your needs evolve.
Transform Your Tiny Space Into a Laundry Powerhouse
Small laundry rooms don’t have to feel cramped, chaotic, or inefficient. By implementing these strategic storage solutions and organizational systems, you can create a space that handles your family’s laundry needs with room to spare. The key is thinking three-dimensionally—using walls, doors, and even the space under your appliances to create a comprehensive storage ecosystem.
Remember that the best laundry room organization system is one that works consistently with your lifestyle and habits. Start with the solutions that address your biggest pain points, then gradually add other strategies as you discover what works best for your specific space and routine.
Your Next Steps:
- Measure your space and identify which solutions will fit your specific dimensions
- Choose 2–3 strategies to implement first, focusing on your most pressing storage challenges
- Invest in quality storage solutions that will withstand the humid laundry environment
- Create a maintenance routine to keep your organized systems functioning smoothly
With these space-maximizing strategies, your small laundry room will become one of the most efficiently organized spaces in your home—proof that size doesn’t determine functionality when you think creatively about every available inch.